
I know I was intimidated at first, another tool hit the market that that’s getting adoption like wildfire. There are an endless number of avenues to go down in IT, why should I consider this one? I found it was much simpler than I anticipated and the payoff was big. It took me a few days and paradigm changes to get to my final setup and configuration. Hopefully I can cut that timeline down and speed things up for you, to be able to get you on the best Docker solution path for your homelab environment by the time you’re done reading this.
Benefits Of Docker In The Homelab
“Why would I do this anyway? Everything runs fine now the way it is.” The benefits to using Docker over traditional server administration methods are plentiful, most of which I didn’t realize until I had Docker setup wrong. However, once right, I have only reaped the fruits of my labors.
What is a Container?
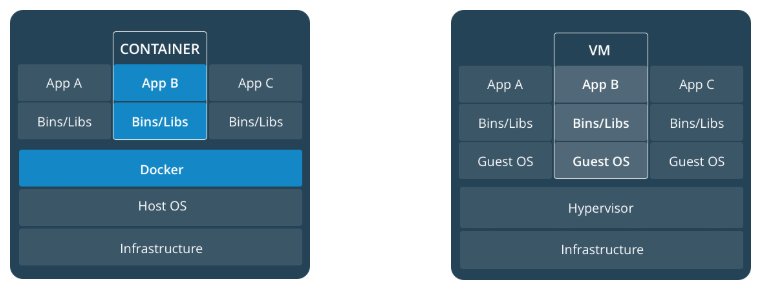
Virtual machines and containers attempt to solve similar problems, isolating services and their dependencies, however containers do it with much less overhead and are exceedingly flexible. Without getting into too much detail, Docker under the hood shares some of the host system resources in a read only fashion while emulating others. This allows the containers to be virtualized, thinking they are their own system, without the overhead of an entire guest os. Being so light weight, we can segregate services and tiers at a granular level without wasting resources. Then at this level we can add, update and remove containers in a fraction of the time and without interruption as appose to entire VMs.
How does this apply to my home server? Before I was running multiple services on a single operating system making a mess after updates and uninstalls. Or I’d run multiple virtual machines wasting resources on my small server. Containers give me the best of both worlds, updating services without python version messes, swapping out a complete image and saving resources running a single guest os. Still not sold? Check out freeCodeCamps post explaining containerization in-depth.
Conceptually how Docker operates compared to traditional virtualization.
Let’s talk more about some of the benefits:
- Ease of Use - Once a container is setup and configured, seldom do need to worry about maintenance. Need to update a service? Docker will download the new image and swap out the old one with as little downtime as a restart. Did the update break and need to revert? Downgrading is quicker than updating with the previous image still saved on the host. Underlying disk failure? Install Docker on your new system, restore the configuration directory, run Docker Compose and you’re back up and fully running in just a few minutes.
- Speed and Efficiency - Get the segregation of virtualization without the resource waste of guest operating systems. Because there is only one operating system in the virtualization stack under Docker you’re not wasting CPU and memory running many containers. Thereafter I observed an increase in unused resources and a boost in performance of the service I run.
- Dependency Freedom - A few services I run in my homelab like HomeAssistant and ZoneMinder have a lot dependencies. When updating I don’t have to worry about cleaning up after them overtime. The core app and its decencies are all contained into a single image. Swapping images in and out is with all of their underlying packages / libraries is effortless.
- Configuration Consolidation - Through the container parameters I can source the individual configurations and persistent data in a singular folder hierarchy. There are reasons you may not want to have all of that sitting in one place but for home use it makes backing up all of my services and their persistent data uncomplicated with a utility like Borg.
Establishing A Baseline
Underlying operating system
You’re going to have to start with a base operating system to put Docker atop of. The hip kids these days seem to be using Rancher OS a lightweight operating system built for running containers. Ubuntu is always an easy go to, chances are you’re familiar with it and will be easy to setup. Personally I’m a vanilla Debian guy. It’s simple, concise and the source for a lot of operating systems today. That speaks more to my personal and professional past. Choose what you’re most comfortable with and will have the easiest time maintaining going forward.
Container Configuration Components
Under the covers Docker utilizes a few different configuration options. Below are the ones I found myself using the most and are probably going to be helpful for you.
- Container Name - A name for the container. I keep them short and lowercase to for easy of reference in the CLI and GUI.
- Image - The underlying source for a container. Images from the community in Docker Hub are referenced by
username/imagenameunless its an official Docker image. Specific versions or releases are denoted with a tag or trailing colon:rcor:0.86.1. ierobwolff3/ga-webserverorrobwolff3/ga-webserver:0.2.0 - Restart Behavior - What it should do if the container halts or is stopped. I find myself almost always using
unless-stopped, always restart the container regardless of the exit status unless it was stopped by me.alwaysin the case of a management container that would be problematic if stopped running, it always restarts it even if I stop it. - Volumes - Used for mounting host paths or persistent volumes. I tend to only use them to mount configuration and service data stored on the host to the container. Using a folder hierarchy:
/home/user/docker/config/gawebserver:/configeverything is organized and condensed. If I blow away the container and recreate it, it’ll pull the same configuration, data and be back up running. - Ports and Network Mode - Ports are exposed one by one, in ranges with and with protocols. Some containerized services don’t play nice in the specified port paradigm, in those cases you can specify
network_mode: hostgiving the container free reign to open whichever ports it would like. Be careful with that last one, you can’t use host networking at the same time as specifying ports. - Environment Variables - How to pass variables into your container. Used heavily for configuring the containerized service. Pretty self explanatory.
- Host Devices - For when a container needs access to host hardware. I’ve used them in the cases of USB Z-wave, USB Bluetooth, mic and speakers.
- Depends On - If a container is dependent on another starting before it does, set a Depends On and they will come up in the correct order.
- Health Check - Useful if you need to preform a health check on a container before considering it healthy. I used a curl health check on Zoneminder to make a dependency on it more reliable.
More on ports: When utilizing a single Docker host all of the running services will share the ip address assigned to that host. The best way to manage this with many services is to utilize a port schema i.e. 9000-9020. Ports exposed inside a container map to ports on the host. They do not have to match allowing a service that listens on port 80 to be exposed on the host as 9003. Further separation can be accomplished with a reverse proxy like Nginx to map services to domain names and more.
Docker Run utilizes command line switches for the parameters above and Docker Compose formats them in a yaml file that is executes into state, more on that later. For information on these parameters and more, reference the Docker documentation I link below, it’s quite good and thorough.
What can I containerize?
Probably more than you think. Try the applications site for documentation or for specific container instructions. If they don’t have a sanctioned container try searching Docker Hub for a community contributed variant. The Docker community has built out a myriad of containers for services otherwise neglected. There are some good resources including Awesome-docker out there making an index. In my homelab I’m running both official and community contributed images:
- HomeAssistant - homeassistant/home-assistant
- Mosquitto - eclipse-mosquitto
- Node-RED - nodered/node-red-docker:v8
- Plex - plexinc/pms-docker
- Samba - dperson/samba
- Nginx and Let’s Encrypt - linuxserver/letsencrypt
- MySQL - mysql/mysql-server:5.7
- ZoneMinder - quantumobject/docker-zoneminder
Some maintenance containers including:
- Portainer - portainer/portainer - A GUI interface to manage your Docker environment
- Watchtower - v2tec/watchtower - Automatically keep containers up to date with latest version
And other supporting services. Chances are you will find a way to run your service in Docker. If not, maybe once you’re persuaded by Docker you can contribute an image of your own.
The Different Methods
There were three different methods I progressed through in my journey to get Docker optimized in my homelab. It started with DockSTARTer. I realized pretty quickly it did not give me the level of control I desired coming from a systems administrations background. I then moved everything over to Docker Run commands. It sounded like a smart idea at the time but when you hear about Docker Compose it should be a no brainer.
DockSTARTer - Fully Managed
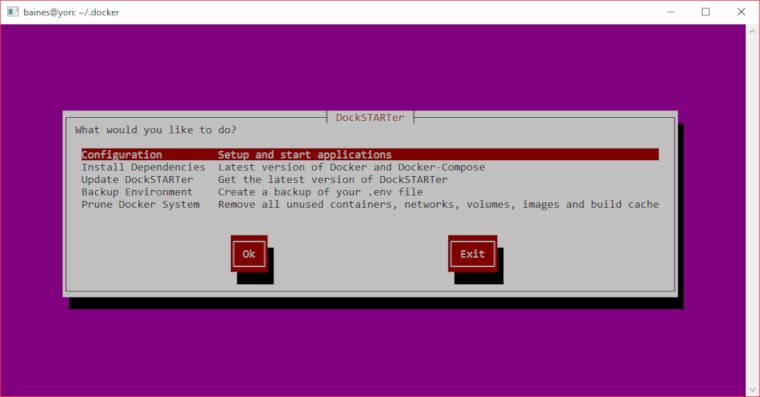
A great utility that will kickstart you into the world of Docker fast. In just a few clicks the utility takes care of the install of Docker, setup and configuration of the containers in a managed Docker Compose for you behind the scenes. It take some of the control away but little investment is needed on your part.
This makes it great to test out Docker if you’re still unsure. Or if you’re not really keen on the components details I’ve described above and just want it to “work” then DockSTARTer may be the approach for you. One drawback to DockSTARTer is that it only supports a limited set of containers. Check that they support the ones you intend to run first before diving in.
Learn more about DockSTARTer and how to install it at their site here.
Docker Compose - Recommended Method
version: "3.7"
services:

  gawebserver:
    container_name: gawebserver
    image: robwolff3/ga-webserver
    restart: on-failure
    volumes:
      - ${CONFIGDIR}/gawebserver/config:/config
      - ${CONFIGDIR}/gawebserver/assistant:/root/.config/google-assistant-library/assistant
    ports:
      - 9324:9324
      - 5000:5000
    environment:
      - CLIENT_SECRET=client_secret.json
      - DEVICE_MODEL_ID=device_model_id
      - PROJECT_ID=project_id
    devices:
      - "/dev/snd:/dev/snd:rwm"
“Sometimes you have to do it wrong a few times before you learn enough to know what the right way is. Or just read the docs, yeah, that would definitely be easier.” This is the an example of a truncated Docker Compose file showing a single service. Additional services would be listed below it, 13 in my case at the time of writing.
All of the Docker components are structured in a yaml file. To implement the compose file execute docker-compose up -d in the directory of the file. Docker will then apply that config and getting it running to that state. Any time Docker Compose is run after, Docker will apply whatever state is specified in the compose file, even if it requires recreating the container. I would recommend this method if you want granular control and to take advantage of the idempotency Docker Compose has to offer.
You can reference the Docker Compose documentation here.
Docker Run - One-off’s And Testing
$ docker run -d --name=gawebserver \
    --restart on-failure \
    -v ${CONFIGDIR}/gawebserver/config:/config \
    -v ${CONFIGDIR}/gawebserver/assistant:/root/.config/google-assistant-library/assistant \
    -p 9324:9324 \
    -p 5000:5000 \
    -e CLIENT_SECRET=client_secret.json \
    -e DEVICE_MODEL_ID=device_model_id \
    -e PROJECT_ID=project_id \
    --device /dev/snd:/dev/snd:rwm \
    robwolff3/ga-webserver
Above is an example of a Docker Run command in bash. I figured out that I could use these one off commands to run containers not supported by DockSTARTer. Once running then using the standard Docker commands to administer them docker [ pull start stop restart exec logs ps ]. Later I ended up with a list of all the Docker Run commands I could execute to get my environment up and running saved in a file. Separating myself from DockSTARTer and giving me more parameter control. After moving over to Docker Compose I believe Docker Run is still useful for running one off containers or testing.
Need to convert Docker Run commands to a Docker Compose file? Use composerize.com It’ll convert it for you speeding up the Docker Compose file creation.
You can reference the Docker Run documentation here.
Installation And First Run - Linux
Underlying Machine and Operating System
I’m going to start off with a few assumptions: You have a functioning server, a Linux distribution installed, the server has internet access, has ssh setup, users/privileges are correct. If I’ve lost you so far, refer to this HowToForge tutorial on how to install Ubuntu 18.04 LTS.
Docker and Docker Compose
There are a lot of installation tutorials out there for Docker, I have boiled it down to the most convenient way to install it. When in doubt, reference Docker’s installation documentation linked at every step.
Installing Docker And Command Completion
This is Dockers install script that installs docker-ce through your package manager. They also endorse manually adding their package repository. Check Docker’s documentation to make sure you’re using the latest version in curl command.
$ curl -fsSL get.docker.com | sh
$ sudo curl -L https://raw.githubusercontent.com/docker/machine/v0.16.0/contrib/completion/bash/docker-machine.bash -o /etc/bash_completion.d/docker-machine
Docker Installation Documentation - Docker Command Completion Documentation
Post Installation Steps
These post installation commands add your user to the docker group allowing access without sudo and enables Docker in systemd to start at system startup. Replace $USER with the user you’re using.
$ sudo usermod -aG docker $USER
$ sudo systemctl enable docker
Docker Post Installation Steps Documentation
Installing Docker Compose And Command Completion
Docker currently does not use the system package manager to install Docker Compose. Use the Curl command below or Dockers pip alternative. Check Docker’s documentation to make sure you’re using the latest version the curl commands.
$ sudo curl -L "https://github.com/docker/compose/releases/download/1.23.2/docker-compose-$(uname -s)-$(uname -m)" -o /usr/local/bin/docker-compose
$ sudo chmod +x /usr/local/bin/docker-compose
$ sudo curl -L https://raw.githubusercontent.com/docker/compose/1.23.2/contrib/completion/bash/docker-compose -o /etc/bash_completion.d/docker-compose
Docker Compose Installation Documentation - Docker Compose Command Completion Documentation
Setting Up The Docker Compose Directory Structure
Now that Docker and Docker Compose are installed we need a place store our configuration and persistent data. Below is my recommendation of a simple folder structure that accomplishes this in your home directory.
$ mkdir -p ~/docker/config/portainer && \
    cd ~/docker
Creating An Environment Variables File
With Docker Compose you have the option to use environment variables for dynamic configuration. Below is mine however I find most people run many more. To create the environment file run and save the following:
$ vim ~/docker/.env
PUID=1000
PGID=1000
TZ=US/Eastern
CONFIGDIR=/home/$USER/docker/config
Use the following command to figure out the correct PUID and PGID to use. I’m using my users PUID and the PGID of the docker group.
USER@machine:~$ id
uid=1000(USER) gid=1000(USER) groups=1000(USER),24(cdrom),25(floppy),29(audio),30(dip),44(video),46(plugdev),108(netdev),1000(docker)
With the environment file saved, you will need to logout and back in or restart your ssh session for it to work properly. (This is also needed for the group you added earlier)
Note: This variable method is Docker Compose specific, you must be in the ~/docker/ directory when executing Docker Compose commands. Other methods include using /etc/environment for global machine variables or .profile for user variables.
Making Your Docker Compose File
To create your Docker Compose file, run the following vim command and paste the configuration below for Portainer or substitute a service of your own.
$ vim ~/docker/docker-compose.yaml
version: "3.7"
services:
  portainer:
    container_name: portainer
    image: portainer/portainer
    restart: always
    volumes:
      - /var/run/docker.sock:/var/run/docker.sock
      - ${CONFIGDIR}/portainer:/data
    ports:
      - 9000:9000
Docker Compose First Run With Portainer
With the directory structure established and our compose file standing by lets run docker-compose up -d from the compose directory to establish the service and get it running.
Docker will output INFO logging, once it gets to “Creating portainer … done” its is setup and ready for use. Browse to your new container at http://IPADDRESS:9000 Setup a admin user, set the Docker environment to local and connect. You’re now managing your new Docker environment in your Portainer container.
Haven’t had enough? Start adding the additional services you want to run in your docker-compose.yaml file and run docker-compose up -d. You’ll have your environment migrated over in no time at all.
Maintaining Your Container Environment
Helpful Commands - Docker Compose
Below I use the bash commands docker and docker-compose interchangeably. Some tasks both commands can do, other tasks one or the other can only do. docker-compose can be especially finicky because quite a few commands you must be in the same directory of the compose file to execute. When in doubt refer to the Docker documentation.
These are the commands I use the most to administer my Docker environment. Using the service HomeAssistant as an example:
The Basics
- Starting a container:
$ docker start homeassistant - Stopping a container:
$ docker stop homeassistant - Restarting a container:
$ docker restart homeassistant - Listing the running containers:
$ docker psor$ cd ~/docker/ && docker-compose ps - View the logs of a container:
$ docker logs -f homeassistant - Drop a shell into a container:
$ docker exec -it homeassistant /bin/bash
Bringing all of the services up - (or back to state)
$ cd ~/docker/ && \
    docker-compose up -d
Updating a specific container
$ cd ~/docker/ && \
    docker pull homeassistant/home-assistant && \
    docker-compose up -d
Updating all containers
$ cd ~/docker/ && \
    docker-compose pull --ignore-pull-failures && \
    docker-compose up -d
Downgrading a container
Edit the image tag of the container in your Docker Compose file to reflect the version you want running i.e. image: homeassistant/home-assistant:0.86.4 and then execute docker-compose up -d
Bringing The Whole Environment Down
$ cd ~/docker/ && \
    docker-compose down
Clean up Docker environment
WARNING - This will delete all unused images, volumes and networks.
$ docker system prune -f && \
    docker image prune -f && \
    docker volume prune -f
Portainer - End Game
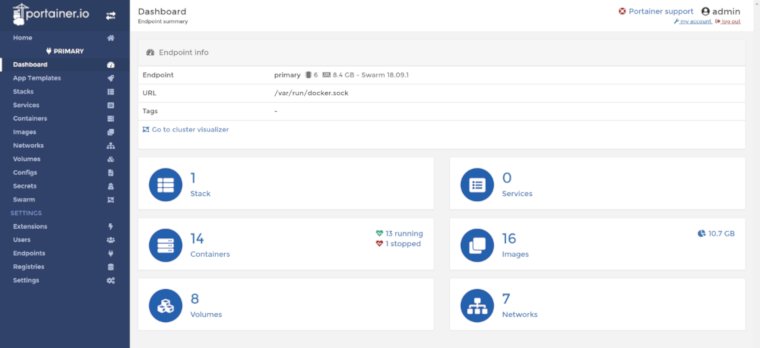
I wanted to add a quick note about Portainer. At first I wasn’t sure how useful it was going to be but turned out to be really handy. It’s great for all of the management tasks I mentioned above but within a web based GUI. When you need to do a quick thing but don’t have a terminal up or like to view your Docker environment visually this tool is great.
Check out their site to learn more and how to install it here.
Conclusion
Before I started this endeavor I was running HomeAssistant, Mosquitto, Samba and some other services on a Raspberry Pi and was never really thrilled with the performance. Another computer I had was running Plex, ZoneMinder and others as well, everything kind of a mess. Now I have all of my resources consolidated on a single machine, services running off of SSD, archive data on mechanical disk with actual running backups. CPU and memory are way better utilized and shared under Docker than individual guest operating systems. All services running better and easier to manage going forward.
I’m sure I’ve only scratched the surface of what Docker is capable of. Hopefully my experiences can help you better manage and run your homelab. It would really be a missed opportunity to pass it up.
Further Reading
- freeCodeCamp - A Beginner-Friendly Introduction to Containers, VMs and Docker
- Docker - Get Started
- Docker Run
- Docker Compose
- Installing Docker
- Installing Docker Compose
Last updated - March 5th, 2019 - See Previous Revisions
Comments